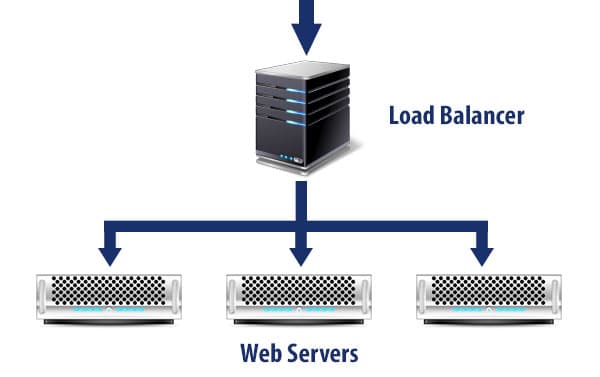
For most website owners a single server will provide them with all of the web processing power that they need, but when it comes to large and complicated sites, sometimes a single web server isn’t enough. When you expand your website infrastructure to multiple servers you will most likely rely on a load balancer to make it all work. So what is a load balancer you ask? A load balancer is a server which will distribute your website traffic among multiple servers. For reference see the image above.
In the above image you can see that web traffic (aka visitors) will first come to the load balancer server, from there that traffic will be forwarded on to one of several web servers to be processed. By distributing the load between multiple servers it keeps the site running fast and allows more visitors to be served. If you have a very high load site, or a site with many many visitors, you could most certainly benefit from having a load balancer, and we of course have years of experience using load balancing technology and can fully handle your transition to a distributed web infrastructure – just call or email us!
If you have recently switched to a load balancer setup or are experimenting with the configuration, you undoubtedly have noticed that after the switch your Apache log files no longer show the IP address of the visiting client for web traffic – it shows the IP address of the load balancer on all entries! However, do not panic, this isn’t permanent and the fix is simple! When a load balancer sends traffic to the web servers it also sends an identifier in the header called “X-Forwarded-For” which includes the IP address of the visitor. In order to fix your logs, we simply have to modify the logging format string to include this hidden header instead of the host IP address.
Inside of your apache configuration file (which is usually located at /etc/httpd/conf/httpd.conf if you are on CentOS or Red Hat Enterprise Linux), look for the following line:
LogFormat "%h %l %u %t \"%r\" %>s %b \"%{Referer}i\" \"%{User-Agent}i\"" combined
Place the following line after the above line in the config file (I actually prefer to place it before because its longer, either way, insert it before or after the above line):
LogFormat "%{X-Forwarded-For}i %l %u %t \"%r\" %>s %b \"%{Referer}i\" \"%{User-Agent}i\"" forwarded
Now that we have added our new “forwarded” log format to the config, we need to tell Apache to use it. So in the config find also find the following line:
CustomLog logs/access_log combined
Comment that line out by placing a hash sign in front of it (#) and then add this line immediately below it:
CustomLog logs/access_log forwarded
That’s all there is to it! By inserting the line above we are changing that format to use the X-Forwarded-For header tag (which contains the IP address of the visitor, forwarded from the load balancer) instead of the host IP address (%h – which will always be the IP of the load balancer).
Now when you look at the logs on any of your web servers they will appear like they did before you had the load balancer. This allows you to properly troubleshoot, to know what IP to block in cases of hacking or website scripting and scraping, and to be able to use web traffic apps like AWStats or Webalizer!
Special Note:
In your virtual hosts setup (where you setup the different websites), if you specify a custom log file you must also modify those config files to use the new “forwarded” format. So you would change the CustomLog line in the virtual config for the site to say “forwarded” instead of “combined” or “common” (most setups use combined format).
So you may ask your self why we create a new “forwarded” log format instead of just updating the “combined” format (like our cheat below). There is a good reason for this. Most load balancers do not do SSL termination, which means if your site has a Secure Certificate (an https:// connection) then it passes directly to your Apache Web Server instead of being handled by the Load Balancer. Notice I said that *most* do not provide SSL termination, some do, but most (like Varnish) do not. So if you update your “combined” format and make it apply to all of the server log files, you will suddenly find that your log files for the SSL sites do not have the visitor’s IP address logged!
In a mixed non-SSL/SSL environment (which most sites would fall into) you MUST create the new LogFormat and then specify the “forwarded” log format on sites that are behind the load balancer, and then used the “combined” format on the sites that are not, otherwise your log files will not log the IP addresses properly!
How to cheat and not have to change your virtual host configs:
If you prefer not to create a new LogFormat and have to update all of your virtual hosts to use it, you can easily make the entire server use the new log format. Instead of creating a new LogFormat, we’ll just update the existing “combined” format. So you would locate the LogFormat line for the “combined” format and comment it out by placing a hash (#) sign at the start of the line, then you would add our new LogFormat line but instead of calling it “forwarded” we would call it “combined”. The finished result would look like this:
#LogFormat "%h %l %u %t \"%r\" %>s %b \"%{Referer}i\" \"%{User-Agent}i\"" combined
LogFormat "%{X-Forwarded-For}i %l %u %t \"%r\" %>s %b \"%{Referer}i\" \"%{User-Agent}i\"" combined
In this setup we do not change the “CustomLog logs/access_log combined” line, we leave it as is. When using this setup be sure to read our special note above regarding SSL vs non-SSL sites and logging.